 Repair (not available with the Free Viewer and in EXE files)
Use the Repair tool to delete faces, fix inverted faces and open edges, create triangles, and move edge points.
The Repair toolis located in  More in the Tools group of the 3D-Mode tab.

Basics
Select model
The Repair tool can only display and repair one model at a time. If there are multiple models, click << or >> until the wanted model is displayed.
Display
The Repair tool will show open edges in yellow and backs of triangles in red. This makes it easier to locate irregularities.
 Tip
Tip
In the Display group activate the shade mode  Shaded with Triangles. This makes the selection easier.
Delete
To delete faces, curves, or PMI click the Delete tab.
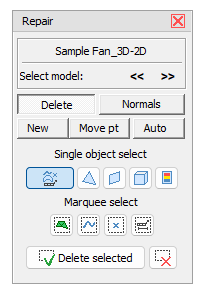
Single object select
The following selection modes are available:
 Select surfaces, curves, reference points, and PMI
 Select a single triangle
 Select a plane surface
 Select connected triangles
 Select connected triangles in the same color
Move the cursor over the model. Details of the model will be highlighted in bright blue according to the selection mode. Click to select the highlighted elements. Selected elements will be highlighted in green color.
Marquee select
The following marquee selection modes are available:
 Marquee select curves
 Marquee select triangles
 Marquee select reference points
 Marquee select PMI
Click into the display, hold the mouse button and drag the selection rectangle over the desired elements. All elements that are within the selection rectangle completely will be selected and highlighted in green color.
To delete selected elements click  Delete selection. To remove the selection without deleting the elements click on
  Reset selection.
 Note
Note
The marquee selection modes will select the visible elements and all elements behind them.
Normals
To invert surfaces click the Normals tab.

Single object select
The following selection modes are available:
 Select a surface
Select a single triangle
Select a plane surface
Select connected triangles
Select connected triangles in the same color
Move the cursor over the model. Details of the model will be highlighted in bright blue according to the selection mode. Click to select the highlighted elements. Selected elements will be highlighted in green color.
Marquee select
The following marquee selection modes are available:
Marquee select triangles
Click into the display, hold the mouse button and drag the selection rectangle over the desired elements. All elements that are within the selection rectangle completely will be selected and highlighted in green color.
To delete selected elements click  Invert selection. To remove the selection without inverting the elements click on
  Reset selection.
Note
The marquee selection modes will select the visible elements and all elements behind them.
New (create new triangles)
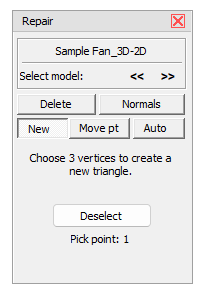
Click the New tab to create new triangles.
Create a new triangle by picking three edge points. To make the selection easier, the edge points of the triangles are displayed.
Click three edges points to select them.
Click the Deselect button to reset an erroneous selection.
When the three points are selected, the new triangle will be created. Its orientation is calculated based on the adjacent triangles.
Move pt (Move points)
Click the Move pt tab to move edge points.
Move two edge points on top of each other, e.g. to close open edges. To make the selection easier, the edge points of the triangles are displayed.
Click the edge point to be moved. Then click the edge point in target position.
Click the Deselect button to reset a false selection.
Click the Confirm button to move the point.
Note
Moving points will delete triangles if two point of a triangle are on top of each other or all points are on one line.
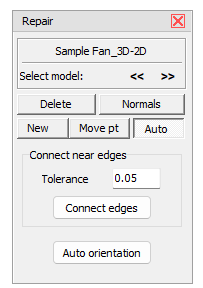
Auto (automatic repair)

Click the Auto tab to automatically repair inverted faces and open edges.
The automatic repair tries to close open edges and turn inverted triangles.
Tolerance (Default 0.05mm / 0.002 inch)
Enter the distance value to be used for the automatic connection of open edges in the Tolerance field. The automatic repair tries to close all open edges based on the tolerance distance. Increasing the tolerance may close more open edges.
Connect edges
Click Connect edges to automatically close open edges.
Decide if you want to keep the part relations for the current model.
- Yes: The repair will keep the current part assignments and names.
- No: Based on newly connected edges, the repair may put the parts into a new arrangement. This may be useful if the parts consist of multiple shells, but the names of the parts may be lost.
Auto orientation
Click Auto orientation to automatically turn inverted triangles. The automatic orientation tries to assign the same orientation to all connected triangles.
Note
The automatic repair will not always completely close models with open edges or flipped surfaces. To get a "watertight" model more or less extensive manual repairs are needed
Tip
Execute Auto orientation and Connect edges multiple times in rotation to correctly orient as many faces as possible.