 Animation (not available with the Free Viewer and in EXE files)
Use the Animation tool to create an animation of your Custom Views.
The Animation tool is located in the Presentation group of the 3D-Mode tab.

Basic Approach
An animation consists of multiple Custom Views that are used as key frames.
To do so, take the following steps:
- Generate different Custom Views of the model.
- Activate the Animation tool.
- Create a
 New Animation.
 - Add Custom Views as key frames to the animation.
- Put the key frames in the wanted order and adjust their time of transition.
 Example 1
Key frame 1 shows the front of the model.
Key frame 2 shows the left side of the model.
When the animation is run, the model will turn from the front to the left.
Example 2
Key frame 1 shows a regular view of the model.
Key frame 2 shows an exploded view of the model.
When the animation is run, parts of the model will move from their original position to their positions after the model has been exploded.
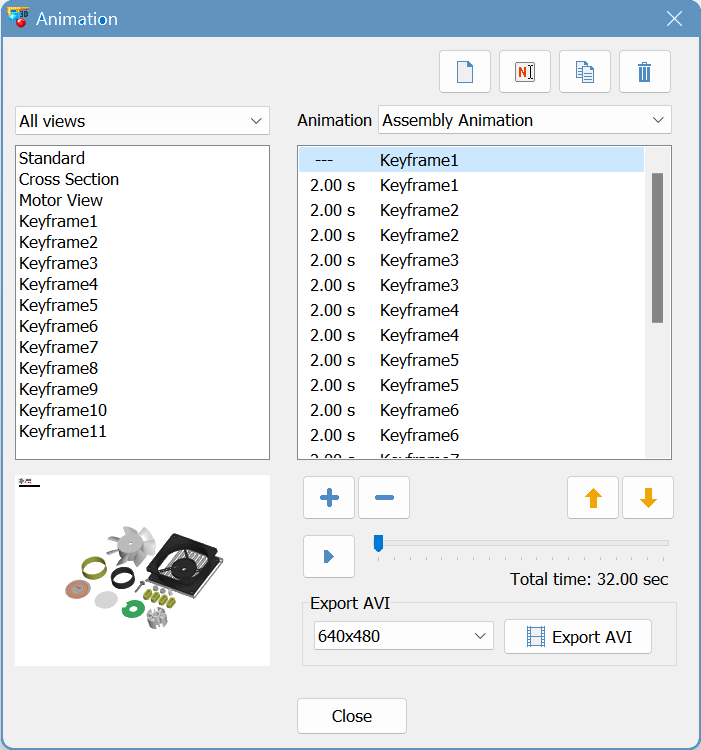
Create Animation
Animation
Choose an animation from the drop down list. If no animations were created, the list is empty.
New animation
Create a new animation.
 Copy selected animation to new animation
Copy the current animation and create a new animation.
 Rename animation
Change the name of the current animation.
 Delete animation
Delete the current animation.
Animation key frames
The lists of the key frames in the current animation and their transition times in seconds.
The list will be empty when a new animation has been created.
To change the transition time of a key frame, double-click the transition time and enter the new time.
Custom Views
List of the available Custom Views.
Use the Filter if there are orthogonal and perspective Custom Views. The transition between the two cannot be animated and, thus, would be discontinues. So combining the two modes of display is useless. Choose a display mode from the drop down list.
Preview thumbnail
The thumbnail on the upper left side is a preview of currently selected Custom View or key frame. This makes it easier to select key frames or Custom Views.
 Add selected Custom View to key frames
Add the views selected in the list of Custom Views as key frames to the animation. New key frames will be added to the end of the animation.
 Remove selected key frame
Remove the selected key frame from the animation.
 Move selected key frame up
Move the selected key frame up by one position on the list.
 Move selected key frame down
Move the selected key frame down by one position on the list.
Change transition times
Change the transition time of a key frame by double-clicking the time and entering a new time (in seconds).
 Start preview
Show a preview of the current animation in the preview thumbnail. To abort the preview, press Esc.
Play Animation
Click OK to exit the Animation tool. Now the animation can be played using the  Play Animation button in the Presentation group.
Animations will also appear at the end of the Custom Views list and can be started from there.
Export AVI
An animation can be exported as AVI video.
To do so, take the following steps:
- Click the Resolution button until the wanted resolution is displayed..
- Click on Export AVI.
- Select where you want to save the video, and enter the name of the video.
- Select the Compressor (video codec) to be used. Depending on the compressor, it may be possible to make further adjustments through the Key Frame and Data Rate option and through the Configure button.
- Click OK to start generating the video.
Depending on the compressor, the length of the animation, the resolution, and the capacity of the computer this process may take some time.
 Note
Note
A resolution lower than 800x600 pixels will not show fine lines, small details, and smaller text of, for example, dimensions and markups.
Videocodecs
The AVI format is a container for various video codecs. All AVI files will have a *avi ending no matter what compressor was used. The codec has to be available so the video can be played.
The following codecs have been tried; however, this is not an exhaustive list and only a short overview.
- Full frames (uncompressed)
(Limited Suitability) Offers the best quality without lost data but creates a large file. It can be useful, if the video will be edited with a video editing software or further converted. Caution: Only files of up to 2 GB are supported. - Cinepak by Radius
(Suitable) Delivers good results and small files. The display is sharp and the color gradients will be displayed accurately. - Intel Indeo R3.2
(Not Suitable) Creates small files but an unfocused display with jagged color gradients. - Microsoft Video 1
(Limited Suitability) Very sharp display but poor color gradients and relatively large files. - Microsoft Video 9
(Suitable) Small files and decent quality; however, color gradients may be inaccurate. - DivX
(Very Suitable) The display is focused and color gradients are smooth. Even with high resolutions, small files are created. But, depending on the DivX version, there may be problems when exporting videos with high resolution. - MPEG-4
(Very Suitable) The display is focused and the transitions are smooth. Even with high resolutions, small files are created. Best results.