 Explode
Use the Explode tool to manually or automatically create an exploded view of your models.
The Explode tool is located in the Tools group of the 3D-Mode tab.
 Measure and Markup in Exploded View
Save Exploded View as Custom View
 Manual Explode
Select a part by clicking on the model. Move the cursor onto a part of the model in the display and move the part while pressing the left mouse button. In this mode only single parts can be moved.
Pick models, assemblies, and parts in the Model Tree. All parts selected in the Model Tree will be displayed in red. Move the cursor onto one of the selected parts of the model in the display and move the parts while pressing the left mouse button.
 Move parts
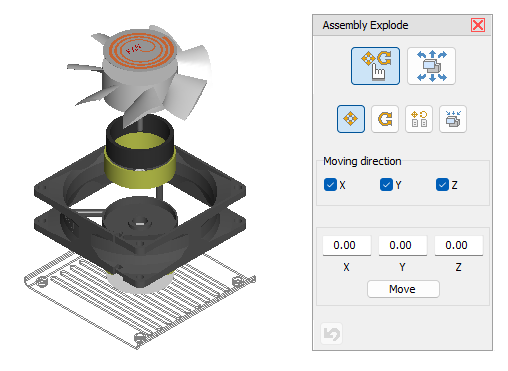
Move the selection by dragging it while pressing the left mouse button. For an easier positioning, deselect one or two of the axes x, y, z under Move direction or enter values in the x, y, and z fields, and then click the Move button.
 Rotate parts
Rotate the selection by dragging it while pressing the left mouse button. Choose the axis of rotation in Rotation axis.
- Axis: Rotation around one of the center axes (ax, ay, az) of the selection.
- Screen: Rotation around one of the screen axes (sx, sy, sz). These axes depend on the viewing angle. The sz-axis points to the viewer, the sx-axis points right, and the sy-axis points up.
The angle of rotation is displayed in the Angle field. For an exact rotation, enter a value and click the Rotate button.
 Copy position from another part
Copy the movement and rotation of a part to other parts. Click the part on the model whose movement and rotation is to be copied (target). The part will appear in green. Then click on all parts that you want to move and rotate according to the target. To select a new target, click the Pick target button.
 Reset position
Click an exploded part on the model, and it will be returned to its original position. Click the Reset all button to return all parts to their original positions.
 Undo
Undo
Undo the last action.
 Tip
Tip
Double-click on parts of the model in the display to return them to their original position.
 Automatic Explode

Auto explode all
Explode all parts of the models automatically.
If there are parts that are already exploded, these parts will be reset and newly exploded. Automatic explosions can be adjusted further manually.
Assembly only
Explode only the parts of the assembly currently selected in the model tree. Sub-assemblies within this assembly will be exploded as a whole and not split up. To simultaneously explode the parts in X, Y, and Z direction, click the Auto explode this assembly level button. To explode only in X, Y, or Z direction, click the accordingly labeled buttons.
Include sub-assemblies
Explode the parts of the assembly currently selected in the model tree and all parts of its sub-assemblies. To simultaneously explode the parts in X, Y, and Z direction, click the Auto explode this assembly level button. To explode only in X, Y, or Z direction, click the accordingly labeled buttons.
-X, +X, -Y, +Y, -Z, +Z
Move the parts selected in the model tree in the selected direction out of their superior assembly. If parts of multiple assemblies are selected, all selected parts will be moved jointly outside the superior assembly.
To center
Reset the parts selected in the model tree to their common explosion center. For example: You exploded the parts of an assembly and then moved the exploded assembly out of the model. Now, if you select this assembly in the model tree and then click To center the parts of the assembly will be reassembled on the spot.
To origin
Reset the parts selected in the model tree to their origin, which means their original position in the model.
Undo
Undo the last action.
Measure and Markup in Exploded View
Use the  Measure/Markup tool to add 3D dimensions and markups in the exploded view of your models.
To do so, click the  Measure/Markup tool and then either activate
  Show Exploded in the Dislay group or load a Custom View that contains exploded data.
You can measure on single parts or between non-exploded parts. Move the cursor across the model and possible references will be shown in light blue.
To attach a note, move the cursor across the model. Possible references will be shown in light blue.
 Note
Note
Activating the Measure/Markup tool sets the model back into the assembled state first.
Save Exploded View as Custom View
Save the exploded views of the model as Custom Views. This way you can restore them as needed and use them in Animations and in the Print and Create Picture settings. You can save Custom Views while working with the Explode tool. Also, there is a corresponding prompt when you exit the tool.
 Note
Note
If a view contains explosion data, you can switch between exploded and assembled view through the Show exploded button in the Display group. The explosion data of a view are retained until a new Custom View is selected.